How to Create a WhatsApp Business Account in 2025

The WhatsApp Messenger app isn’t built for business, and you’ve realized that. Now, you’re ready to make the switch from WhatsApp Messenger to WhatsApp Business App. Smart move.
If you want to get started with the Business App, you’re in the right place. The first step is to create a WhatsApp Business account.
Sounds simple, but this is where many businesses get stuck. What app should you download? How do I create a WhatsApp Business account? What information is required to set up a business profile? These small decisions can have a big impact.
This guide walks you through a step by step process of how to set up a WhatsApp Business account. By the end, you’ll have a working business account on WhatsApp that will help you connect with customers professionally.
Why use a WhatsApp Business account
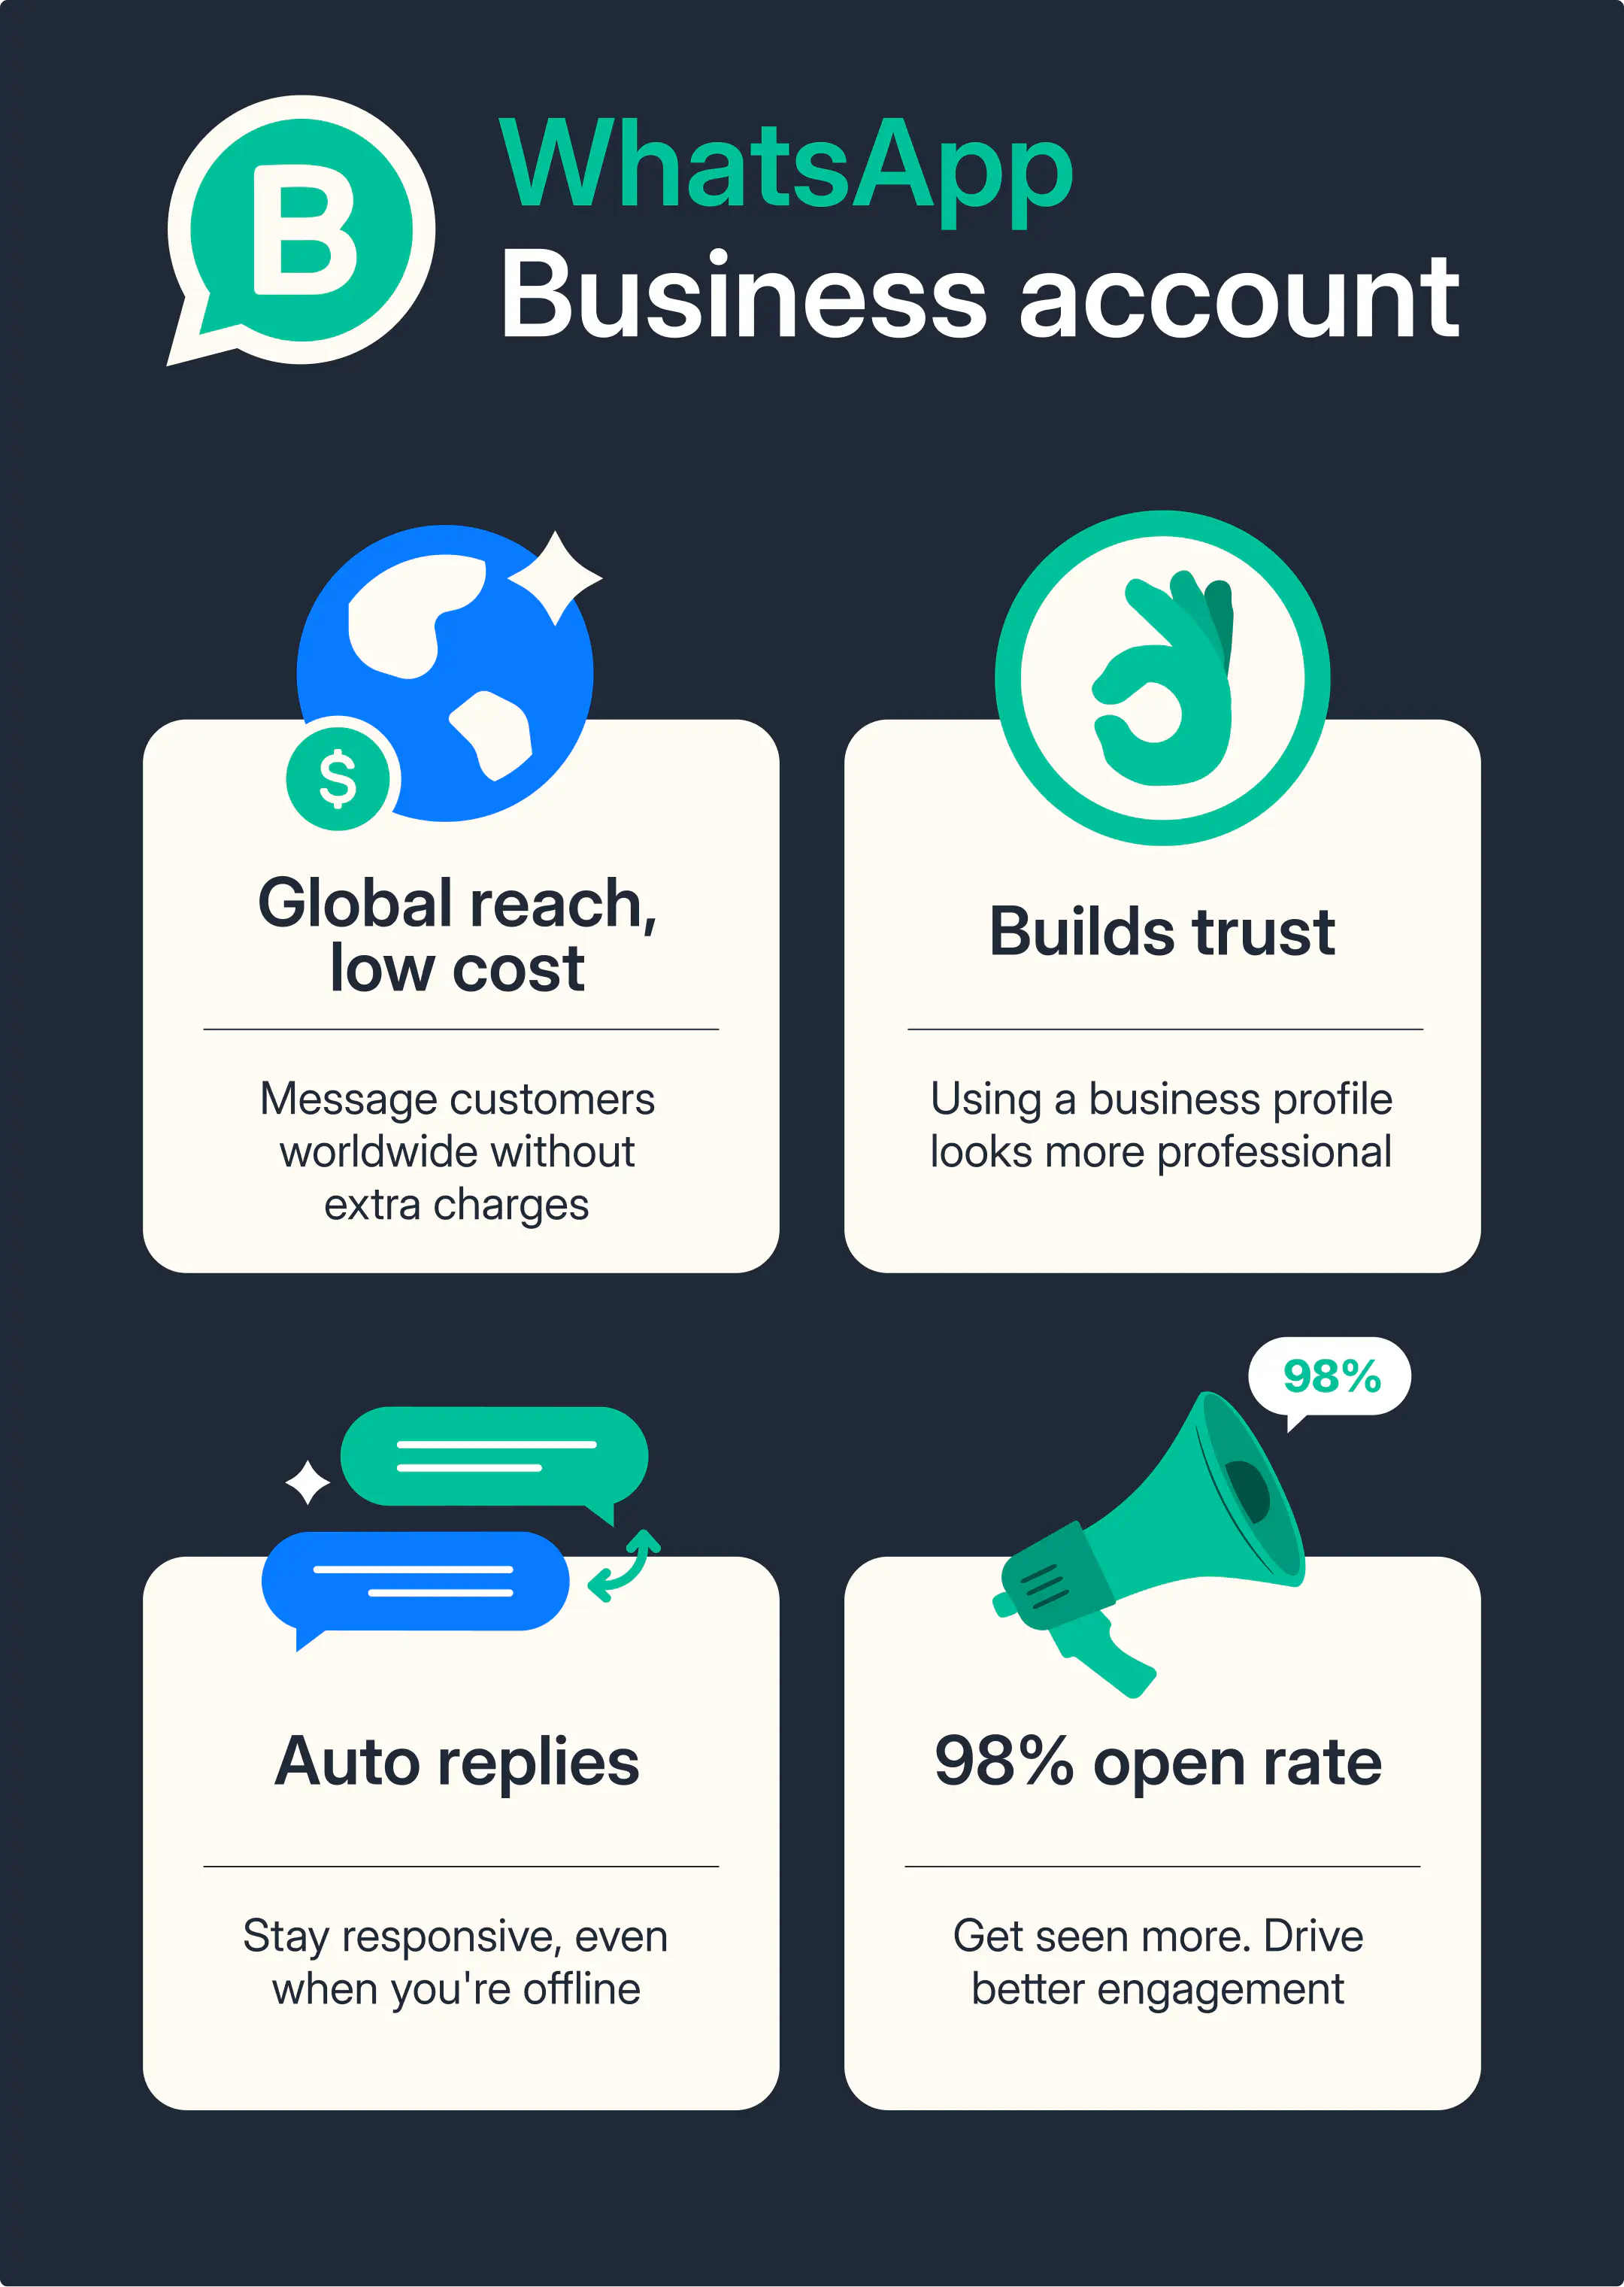
If you keep using the regular WhatsApp app for your business, you’ll be missing out on Whatsapp features that can make customer communication faster, easier, and more professional.
A WhatsApp Business account is built specifically for businesses. It offers businesses powerful tools to connect with customers on a platform they already trust and use daily.
Here are some key benefits of a WhatsApp business account:
- Professional business look: Instead of showing up as a random number on a customer’s WhatsApp, your business will have a verified business profile with your name, logo, and contact details.
- Better organization: Use labels to sort conversations, quick replies to save time, and auto-replies to respond instantly, even when you’re offline
- Higher customer engagement: WhatsApp is the most popular messaging app in the world. People prefer messaging over email. It’s faster, more personal, and more likely to get a response.
Now that it’s clear why businesses need a WhatsApp business account to grow, let’s breakdown how to set up your account on WhatsApp Business.
How to create a business account on WhatsApp
There are 3 simple steps you need to set up a WhatsApp Business account:
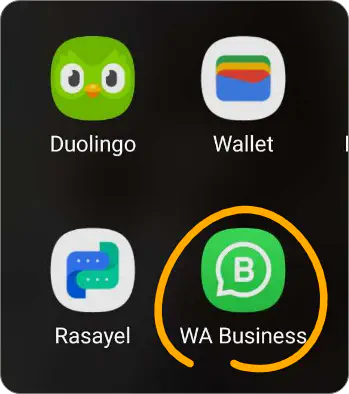
1. Download the WhatsApp Business app
Download the WhatsApp Business app from the Google Play Store or App Store. Once installed, tap the WhatsApp Business icon on your home screen to open the app.
2. Register your phone number
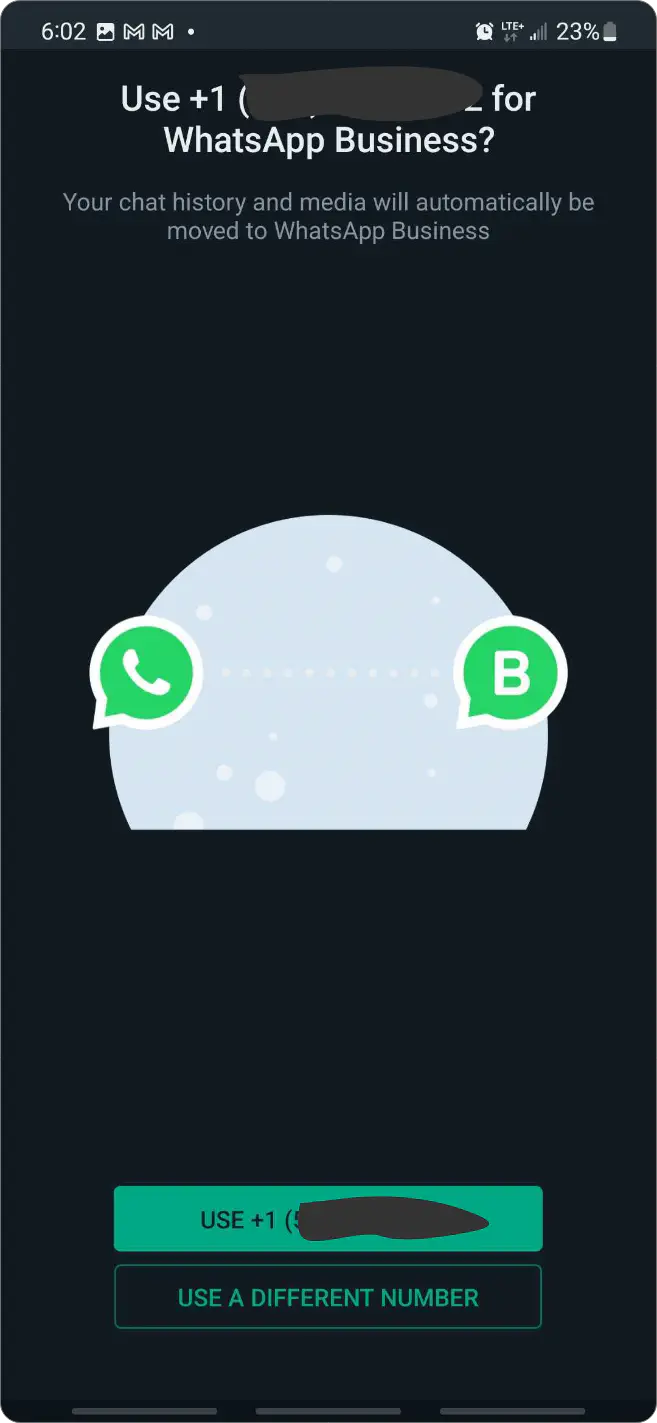
If you already have a personal WhatsApp account, the app will ask whether you wish to migrate that account to the WhatsApp Business app.
If you want to migrate your existing account, select use +XXXXX or use a different number if you’d prefer to use another number to keep your personal and WhatsApp business accounts separate.
In this example, we’ll select use a different number:
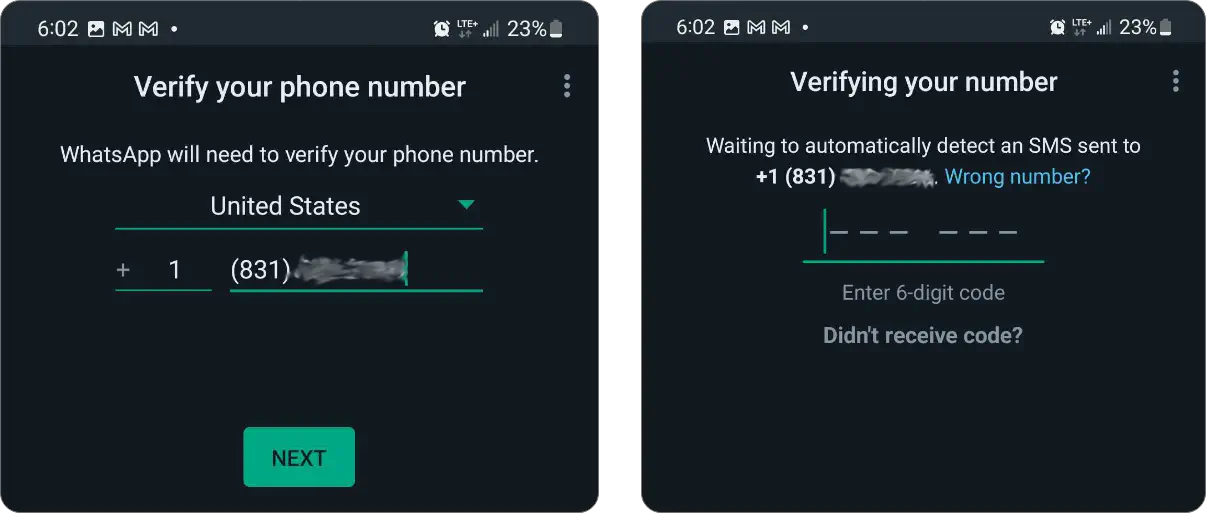
On the following screen:
- Select your Country
- Enter the phone number you’d like to use.
- Click Next to verify the phone number
- Enter the 6-digit code you’ll receive via SMS.
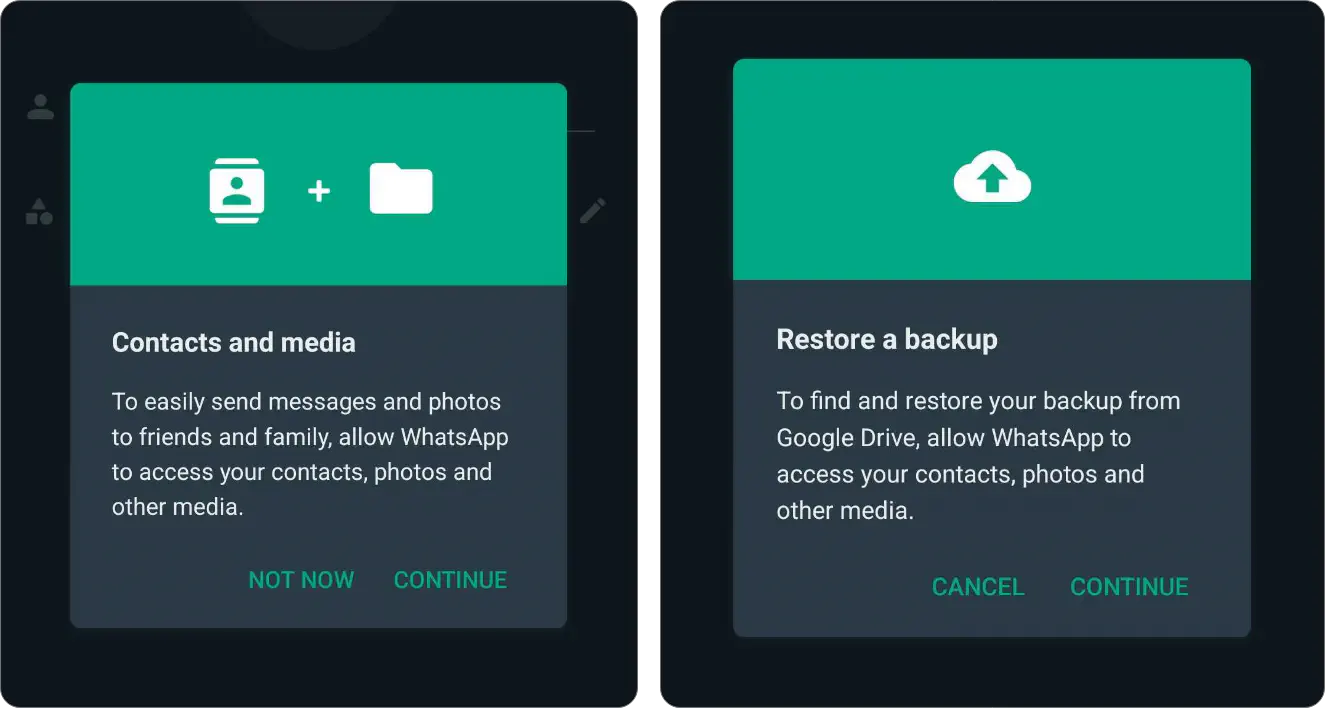
3. Allow access to contacts and media
Once your phone number is registered, WhatsApp will ask for permissions to access your contacts, photos, videos and files.
- Tap Continue to allow access.
- If you want to skip this step, tap Not Now (you can enable these permissions later).
If you have a backup on Google Drive, WhatsApp will also ask if you’d like to restore it.
Tap Continue to restore or Skip if you don’t have one.
That’s it. Now your business account is officially created. The next thing step is setting up your business profile on WhatsApp.
4. Set up a WhatsApp business profile
Creating a professional WhatsApp Business profile is essential for making a strong first impression. But It should clearly communicate who you are, what you offer, and how customers can reach you.
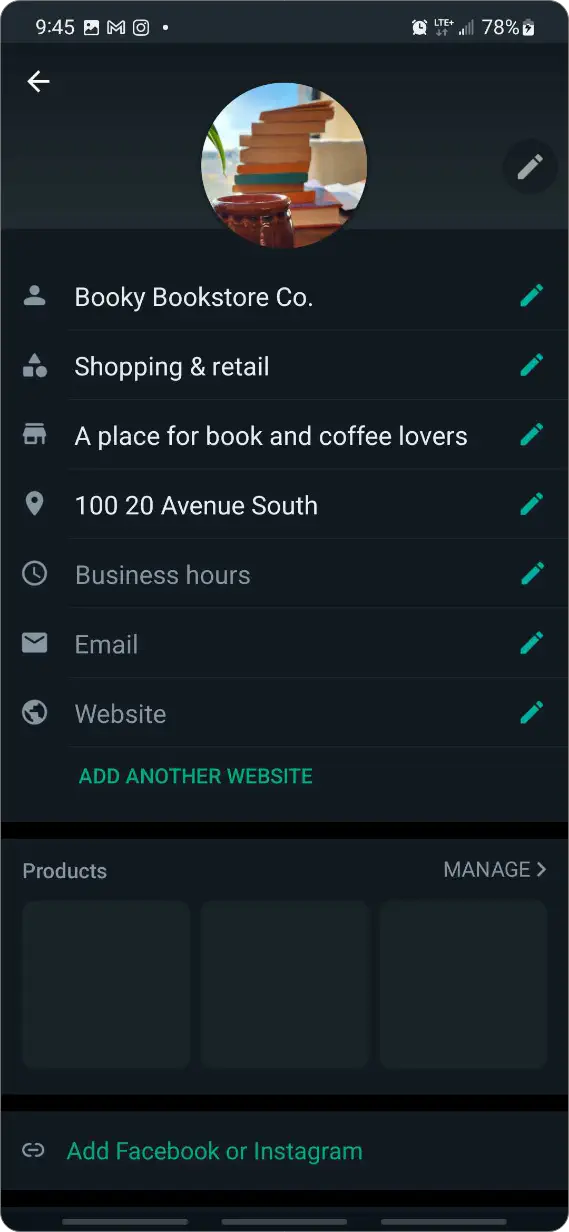
Here are the key WhatsApp business profile elements to include:
Display name: Choose your WhatsApp display name carefully when you create your WhatsApp Business account. It should match your registered business name to build trust. Keep it short, professional, and aligned with your brand.
P.S: Changing your display name later may cause you to lose your “Official Business Account” status, so make sure you choose carefully the first time.
Business logo: Add a clear, high-quality logo that represents your brand identity. Your logo should be simple, easily recognizable, and optimized for small screen displays.
The ideal size for your WhatsApp Business profile picture is 640 x 640 pixels. This ensures the best clarity and detail, even when WhatsApp scales or crops your image. While the minimum size is 192 x 192 pixels.
Using these recommended dimensions helps maintain a professional appearance across different devices.
Business category: It’s important to select the right WhatsApp Business category from the available options. This helps customers immediately understand what are the services your business offers.
Business description: There’s no single formula for how to write a WhatsApp Business description, but the best ones are clear, concise, and customer-focfused. In under 256 characters, highlight what your business does, who you serve, and what makes you unique.
Business hours: Set your business hours on WhatsApp to let customers know when you are available. Being transparent about your availability improves customer satisfaction. If your hours change seasonally or on holidays, make sure to update them to avoid confusion.
WhatsApp Business features you need to know
WhatsApp Business has several features that can help you manage customer interactions efficiently. Here are some of the key features you should know about:
Greeting and away messages
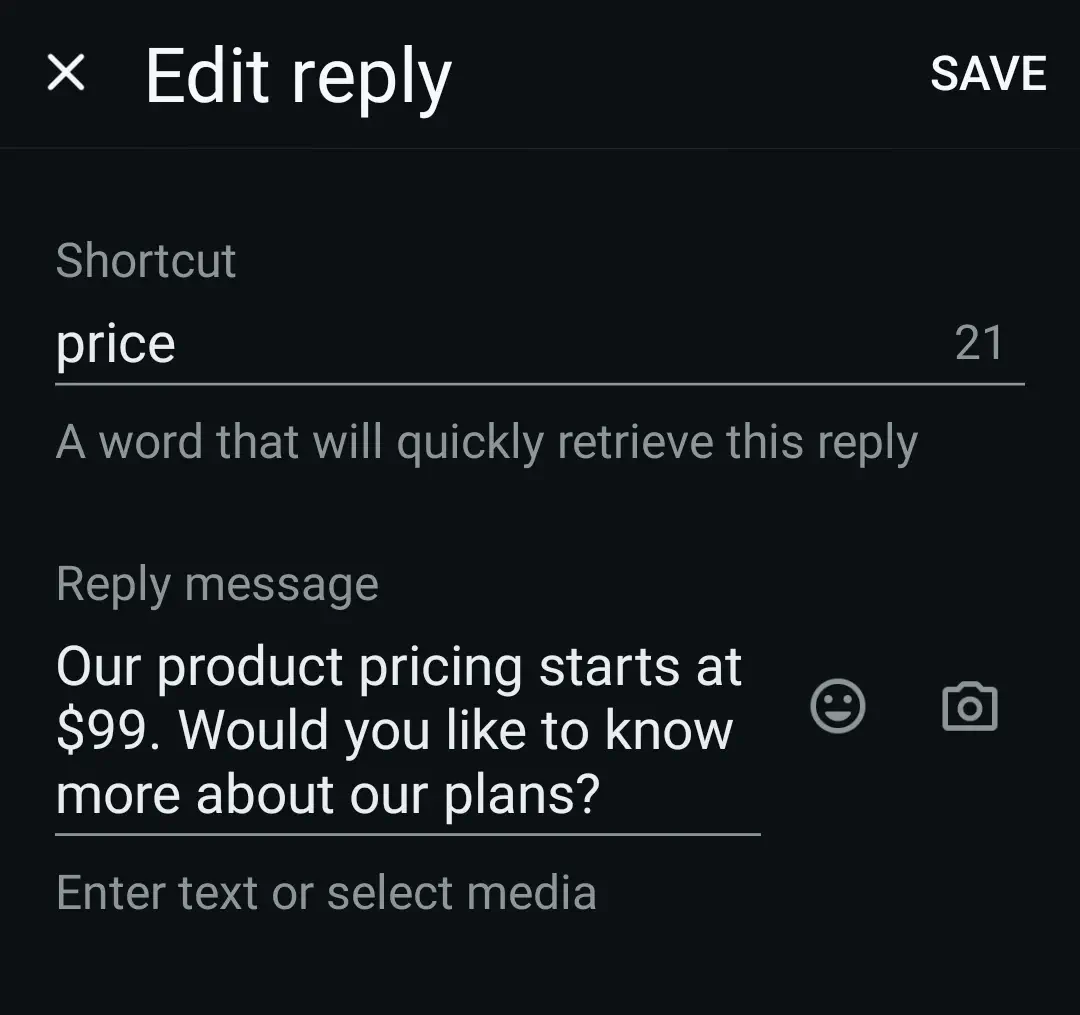
You can set up automated greeting and away messages to stay responsive on WhatsApp Business. Greeting messages welcome new customers, and away messages keep them informed when you’re unavailable, which helps you offer great customer experience at all times.WhatsApp quick reply messages
After personalizing your away and greeting messages, you can set up quick replies, which are pre-written messages that you can send on WhatsApp by typing a shortcut.
Quick reply messages make it easy to answer common questions faster, which saves you time and ensures customers get consistent, accurate responses.
Product Catalog
Create a catalog on WhatsApp to showcase your products or services directly inside the app, making it easier for customers to browse and shop.Labels
Use labels to organize conversations by categories like “New Lead” “Pending Payment” or “Order Completed” which helps you stay organized and prioritize follow-ups.Broadcast Lists
WhatsApp broadcast messages are messages sent to multiple contacts at once without creating a group chat, perfect for updates, promotions, or announcements.
Along with these, there are many other WhatsApp Business features you can make use of to customize your WhatsApp business profile to best fit your needs.
Limitations of a WhatsApp Business app account
Alongside these key features, the WhatsApp Business app gives small teams a solid foundation to manage customer conversations more efficiently. It is a great way to start building stronger customer relationships. However, as your business grows and your messaging needs become more complex, you might find that the app’s basic features aren’t always enough.
Let’s take a look at some of the challenges businesses often face as they scale beyond the basics.
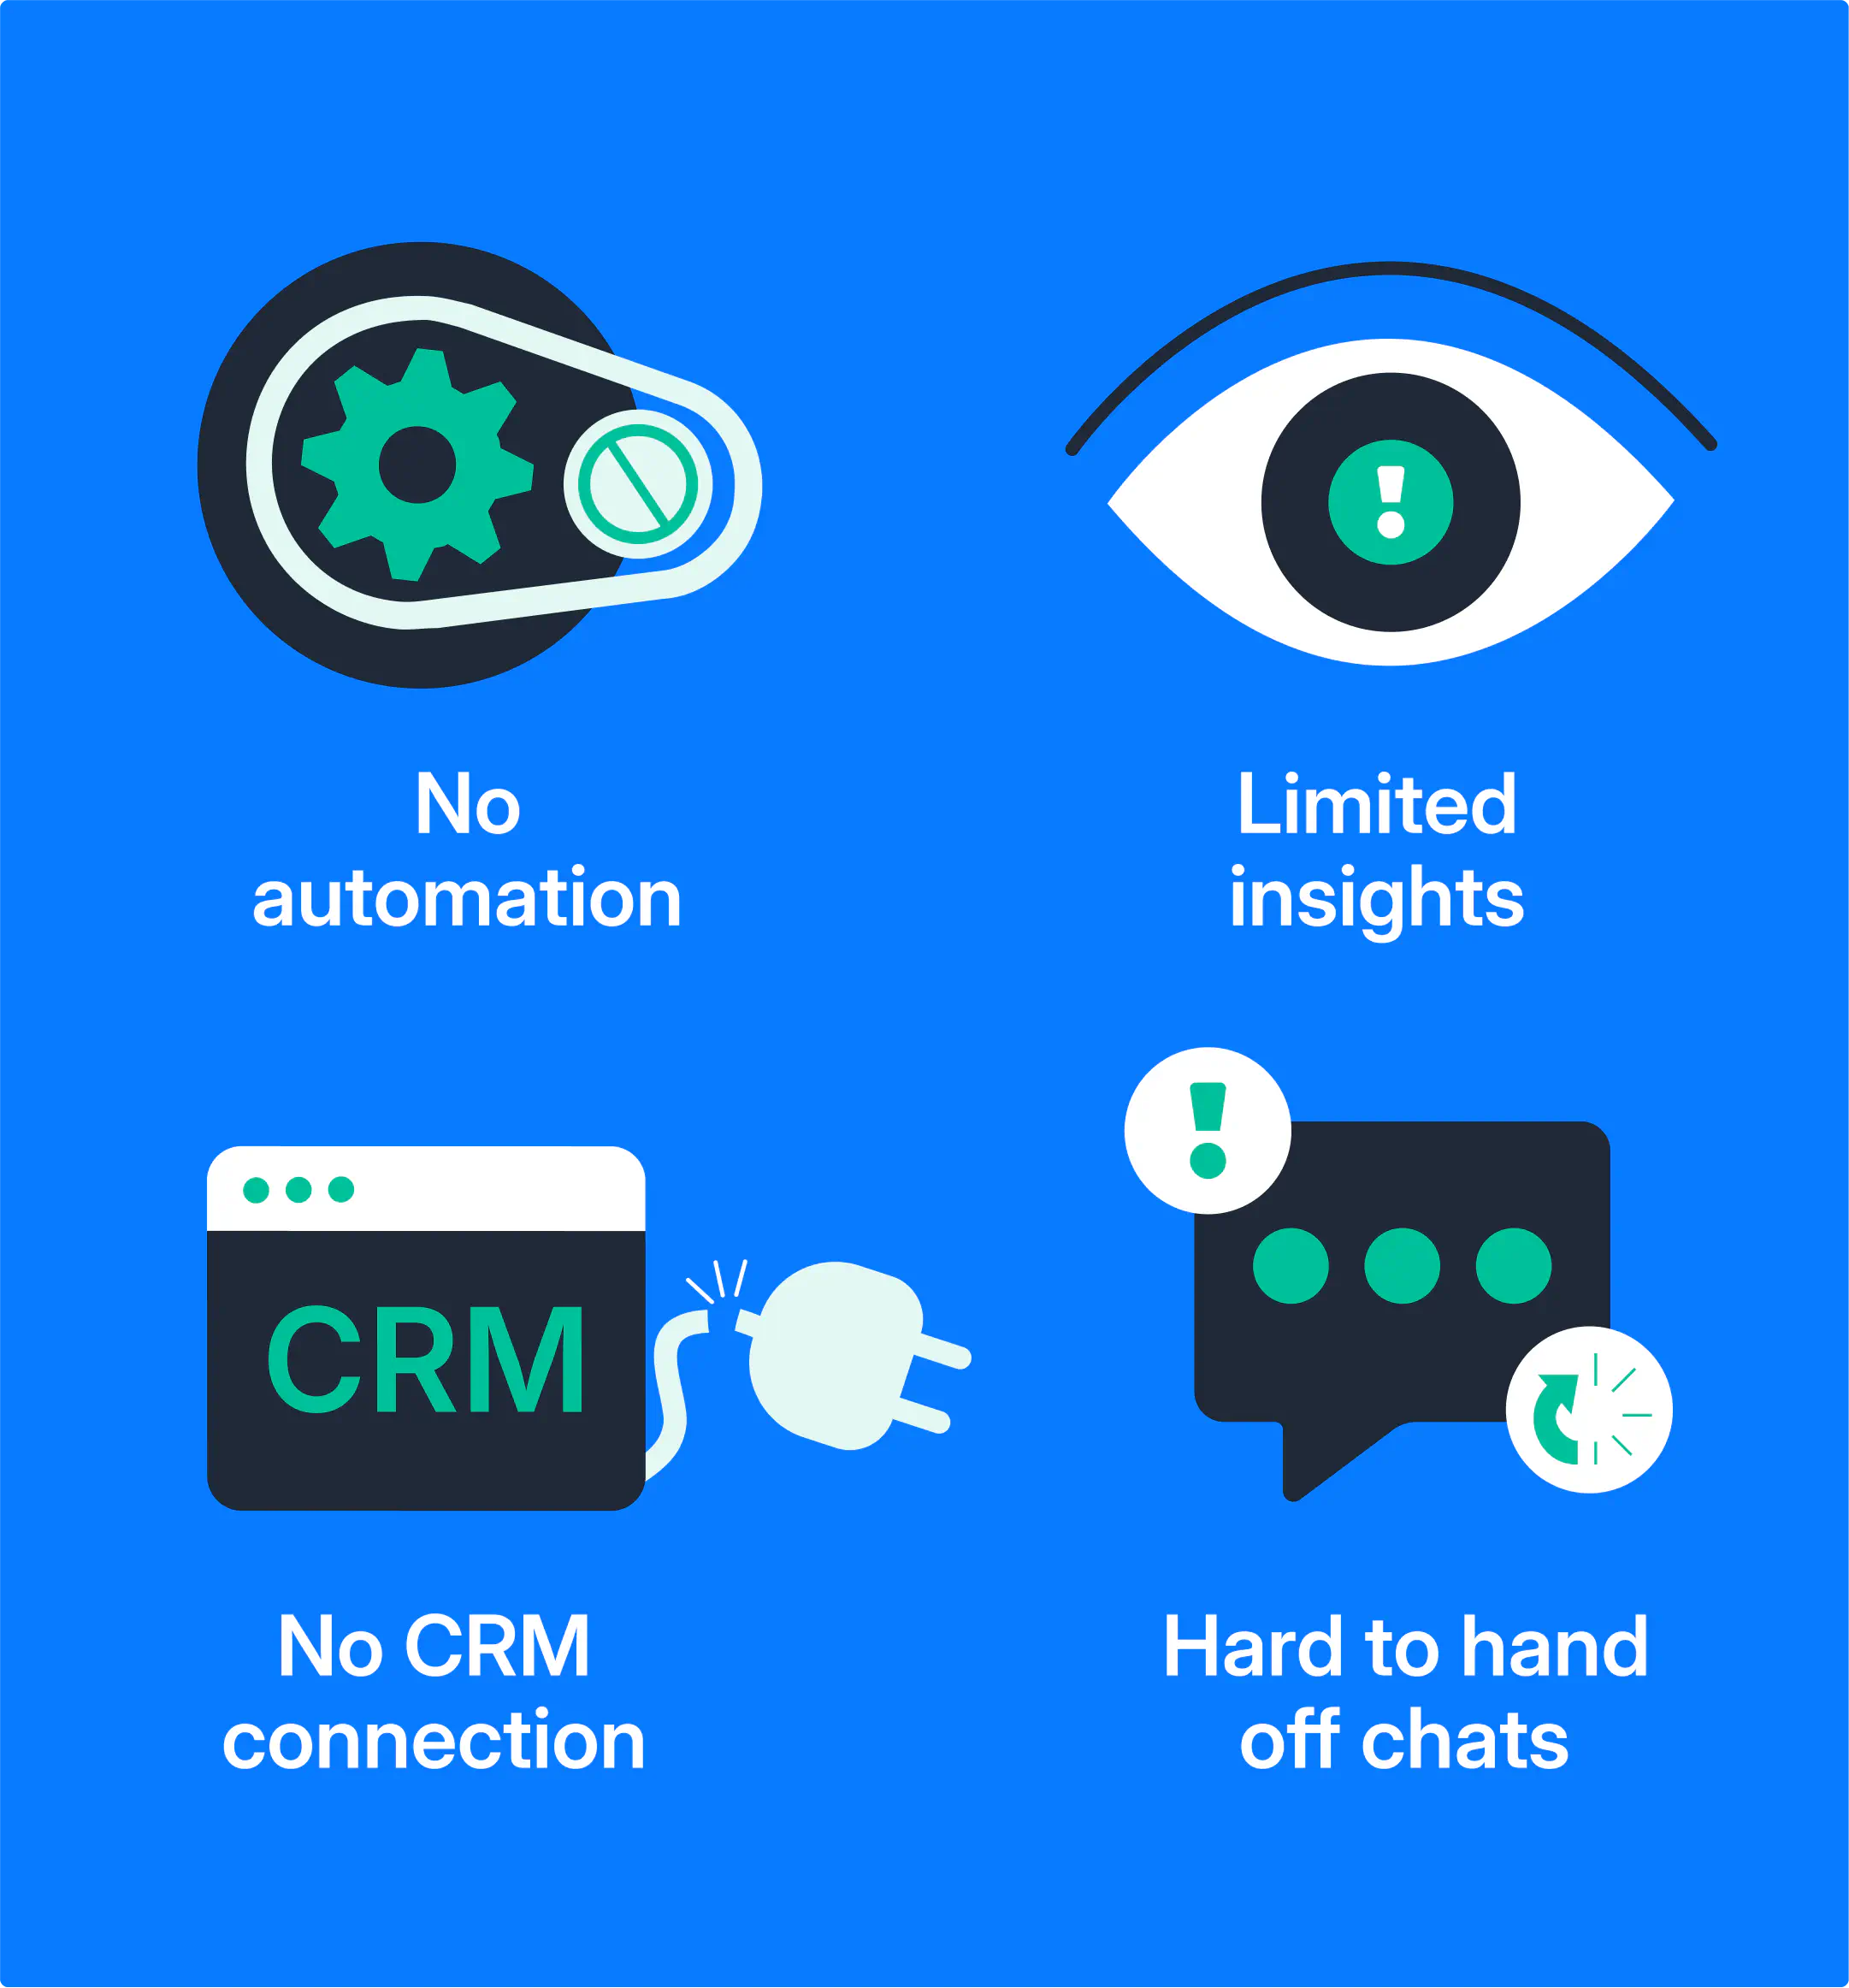
Single-user access: The WhatsApp Business app is designed for one user and has limited multi-device support through WhatsApp Web only.
Basic automation: Only simple greeting, away, and quick replies messages. You don’t get access to advanced workflows, chatbots, or CRM integrations.
No official verification: You can’t apply for the blue verification checkmark when you’re using the app.
Device limitations: Can only be installed on one phone; no easy multi-user access.
Limited messaging scale: Broadcast lists are capped at 256 contacts; only message people who saved your number.
Basic analytics: Only shows basic message stats — no agent-level or team performance tracking.
No collaboration tools: No conversation assignment, internal notes, or proper teamwork collaboration and management.
No multi-channel support: Can’t integrate with CRMs, sales platforms, or customer support tools.
How to choose the right WhatsApp Business solution
If you’re a small business owner managing customer conversations yourself, the WhatsApp Business App is a great place to start. It’s free, easy to set up, and available on Android and iOS.
However, if you have a growing team, need advanced automation, or want official business verification, you’ll eventually need the WhatsApp Business Platform (also known as the API).
Here’s a quick look at the two types of WhatsApp business accounts serving different use cases:
WhatsApp Business app
- Free to use
- Available on Android and iOS
- Best for individual sellers, small shops, and local businesses
WhatsApp Business Platform
- Access via Meta Business Partners
- Used by bigger companies for large-scale customer communication and sales
Want to use WhatsApp Business App and API together
If you’re planning to switch to the WhatsApp Business Platform later or use both the app and API for different purposes, Coexistence makes that possible.
With Coexistence, your sales team can keep using the WhatsApp Business app on their phone, while managers can use the API on a team inbox to manage conversations, monitor performance, and maintain visibility across all interactions.
Final thoughts
Setting up a WhatsApp Business account is a smart move for any business looking to communicate more professionally and efficiently with customers. It helps you separate work from personal WhatsApp chats, gives your business a more credible presence, and unlocks helpful tools for communication.
If you’re just starting out and managing WhatsApp conversations on your own or with a small team, the WhatsApp Business app gives you everything you need to get going. But as your customer base grows or your sales process becomes more complex, you may run into the app’s limitations.
That’s where the WhatsApp Business Platform comes in. And the best part? With Coexistence, your team can continue using the WhatsApp app they’re comfortable with, while your business begins tapping into the benefits of the API — like shared inboxes, integrations, and advanced automation.

Miodrag is a seasoned WhatsApp marketing expert with over 15 years of experience in B2B sales and communication. Specializing in the use of WhatsApp Business API, he helps businesses use WhatsApp’s marketing features to grow their sales and improve customer engagement. As one of the early adopters of WhatsApp Business, Miodrag has a deep understanding of its tools and strategies, making him a trusted authority in the field. His insights have helped many businesses with their communication strategies to achieve measurable results.

![How to use WhatsApp on Desktop and Web [2025 Guide]](https://learn.rasayel.io/en/blog/whatsapp-web-desktop/cover_hu2633909085762267619.webp)